Intro
We love metaframeworks but the industry still runs on express backend and a react frontend and all the microservices added to it over the years. So how would you deploy it on services like Vercel or Cloudflare? The answer is you don’t! What usually happens is backend is deployed on aws and the frontend is deployed on one of these providers simply because they have a very good free tier and the CDN is absolute bonkers. The aws will help you scale your backend and Vercel/CF will make sure your frontend never goes down even if the backend is down for some reason.
So let’s see how we can do that.
Things we need to pull it off:
-
Pulumi: It’s an Infrastructure as a code(Iac) tools that helps in writing infra with the same programming language you’re making your app in. Advantage? It’s easy to reason about and you can use regular code logic to scale your apps. You can use anything but for this we’ll be using Pulumi.
-
Monorepo: A Monorepo will help us make the code more modular so you can add as many web application to your codebase and everything will be controlled by single infra code. For this we’ll be using Pnpm workspace, though you’re free to choose whatever you like.
-
Aws/CF account : If you haven’t, create a cloudflare and a aws account and setup your identity center in your aws. You can create multiple profiles too for your dev and prod environment but we’ll just need one profile for this demo.
let’s create a Monorepo first then we’ll add everything to it. Go ahead and launch your terminal and type:
  mkdir simpleawsapp
  cd simpleawsapp
Now we’ll initialize a project using pnpm:
pnpm initYou should have a package.json in your folder. You can change your project name if you like. Now create a pnpm-workspace.yml and add this to the file:
  packages:
    - backend
Now let’s create the backend
We’ll write a Hono backend since its the easiest way to deploy to aws. (It comes with its own aws adapter)
Open your terminal and write:
bun create hono@latestIt’ll prompt you to select from few options. You need to select aws-lambda template.

Now cd into backend and make some changes to it.
const app = new Hono().basePath("/api")

app.get('/', (c) => {
  return c.json({ 'message': 'Hello Hono!' })
})

export const handler = handle(app)
export default ({
  fetch: app.fetch,
  port: 3000
})
Here we’re adding a basePath to our api and a route that returns a json. We’ll also be exporting the handler using aws-lambda middleware and a default export for our local development environment.
Now open package.json and add the dev script.
"dev": "bun run --hot src/index.ts"It hot reloads your code whenever you make changes to your backend while it running. You can now run your dev server and it should greet you with Hello Hono!
Now let’s define infra for the backend.
Create a directory called infra in the project root directory and add it to the pnpm-workspace.yml Then cd into the directory and initialize a pulumi project.
  cd infra

  pulumi new aws-typescript
This will prompt some question like in which region you want to deploy. In my case it’s ap-south-1, you
can do literally anywhere. It’ll will also copy a pulumi typescript template for us inside the folder and
then we can make changes to it.
But before that set you dev profile using this command:
pulumi config set aws:profile devofc, you can change whatever profile you like (dev/prod). make sure you have installed aws cli and logged in your credentials. If you haven’t logged in yet, you can use the following command:
aws sso --login profile devIf you don’t like setting up profile you can also copy paste your credentials in your shell. refer to the docs as needed.
Now let’s define our backend infra. Open infra/index.ts in your code editor.
const assumeRole = aws.iam.getPolicyDocument({
  statements: [{
    effect: "Allow",
    principals: [{
      type: "Service",
      identifiers: ["lambda.amazonaws.com"],
    }],
    actions: ["sts:AssumeRole"],
  }],
});
const iamForLambda = new aws.iam.Role("iam_for_lambda", {
  name: "iam_for_lambda",
  assumeRolePolicy: assumeRole.then(assumeRole => assumeRole.json),
});
Here we’ll define our basic Policy and IamRole. Just copy paste this, this is fine for our demo. These are important when you’re working with a big team and a lot of people need the access to this infra.
Before we define our handler, install this aws-apigateway package.
pnpm add @pulumi/aws-apigatewayOpen index.ts again and add the following:
const handler = new aws.lambda.CallbackFunction("handler", {
  callback: async (event, context) => {
    return {
      statusCode: 200,
      body: JSON.stringify({
        message: "Root route!",
      }),
    };
  },
});

const api = new apigateway.RestAPI("api", {
  routes: [
    { path: "/", method: "GET", eventHandler: handler },
  ]
});
This is a basic definition of a lambda function, it returns Root route when you’ll go to the main (”/”) route. If you’ve looked up the pulumi docs this is what you’ll find. But we want to create as many endpoints as we want, bundle our Hono Application and then ship as it is.
To do that we’ll define lambda function that takes a zip folder.
const honolambda = new aws.lambda.Function("hono", {
  code: new pulumi.asset.FileArchive("../backend/lambda.zip"),
  name: "lambda_function_name",
  role: iamForLambda.arn,
  handler: "index.handler",
  runtime: aws.lambda.Runtime.NodeJS20dX,
});
When you run pnpm build followed by pnpm zip in your backend it will create a zip folder that is then taken by
our function here.
The build folder “dist” created by your bundler has a file called “index.js” and the “index.js” file has a exported function called “handler”, which is what this lambda function is pointing to. This is important to remember because if you want to use any other backend library like express or nitro, you’ll need to take this into account.
Here’s the script that run when you build your hono backend.
"build": "esbuild --bundle --outfile=./dist/index.js --platform=node --target=node20 ./src/index.ts",Notice that it says --target=node20, make sure when you define your handler it has the same runtime as the target.
Now let’s add this to our API.
const api = new apigateway.RestAPI("api", {
  routes: [
    { path: "/", method: "GET", eventHandler: handler },
+   { path: "/{proxy+}", method: "ANY", eventHandler: honolambda },
  ]
});
Here we’ve added just one line to our api. We’ve given it a catch-all path because and you’ll not need to configure anything from the infra for every endpoint that you’ll create. That’d be too cumbersome wouldn’t it? you could define any number of routes in your hono backend and it’ll handle it. Same with the method.
We’re almost done with the backend here. You’ll just need to export the url so the url will be printed on the console which you can visit and check.
// The URL at which the REST API will be served.
export const url = api.url;
Run pulumi up and watch your backend go live in seconds.
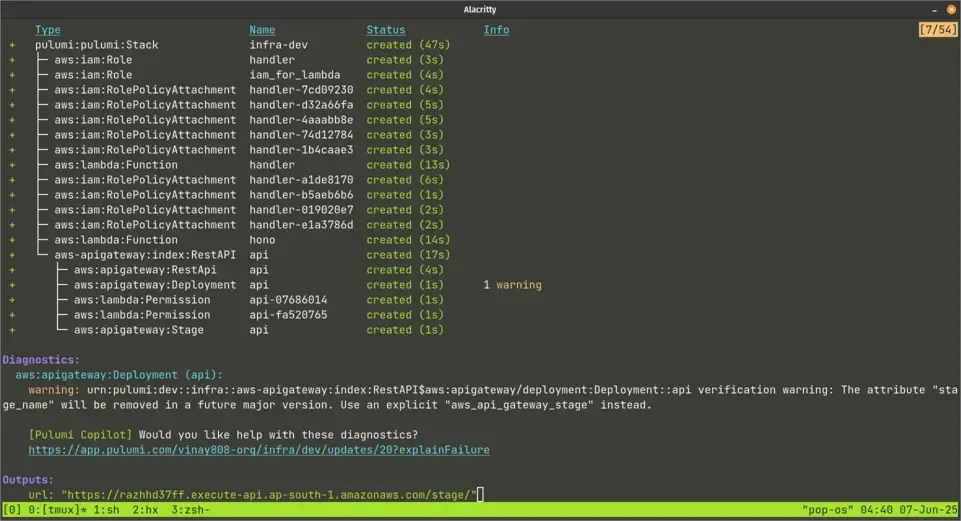
Open the link output and copy the url you’re given. You’ll need it soon.
Let’s get to our frontend
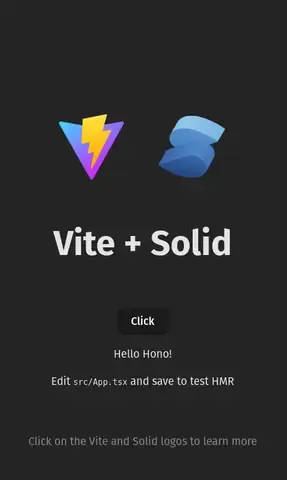
Go back to the root directory and create a vite application using:
pnpm create vite@latestYou can choose any library/framework you like, it’s all the same. I’m using solid.
cd into the directory and open it in your text editor. Open App.tsx or the frontpage of your application and a button that fetches data on clicking.
const [text, setText] = createSignal("emptyString")

return(
<div>
  <button onClick={async () => {
    const response = await fetch(`${import.meta.env.VITE_API_URL}/api`)
                    .then((res) => res.json())
    setText(response.message)
  }}>
    Click
  </button>
  <p> {text()}</p>
</div>
)
Now maybe you could make this code look a bit better by assigning that lengthy variable to a small one like baseUrl but i’ll leave that up to you.
Now create an env.development file and an env.production file and add the URLS.
# .env.development
VITE_API_URL=http://localhost:3000

# .env.development
VITE_API_URL=https://yourOutputUrl.ap-south-1.amazonaws.com/stage
You can now fire up both of your dev servers and look if things are working. Make sure you’ve saved the right port in env.
If everything works as expected, we can now start deploying it.
Install wrangler and vite plugin in your project:
pnpm install wrangler @cloudflare/vite-pluginOpen vite.config.ts and add cloudflare to your plugins:
import { cloudflare } from '@cloudflare/vite-plugin'
import { defineConfig } from 'vite'
import solid from 'vite-plugin-solid'

export default defineConfig({
  plugins: [solid(), cloudflare()],
})
Create a wrangler.toml file and add the following content:
{
  "name": "aws-cf-pulumi",
  "compatibility_date": "2025-04-26",
  "assets": {
    "not_found_handling": "single-page-application"
  },
  "observability": {
    "enabled": true
  }
}
And we’re almost done. You don’t really need much to deploy static site on cloudflare. Make sure you’re logged in on your cloudflare account. If not, you can login and then deploy:
pnpm wrangler loginpnpm build
pnpm wrangler deployWe’re finally done. Our fullstack project is live.
Or is it?
If you try clicking on the button you’ll not see the result displayed.
Open console in your browser and trying clicking the button. You’ll see it complaining about ‘Access-Control-Allow-Origin’ missing.
When you deploy your frontend and backend on different machine (or sources) then you need to give the backend permission to let your frontend access it.
cd into your backend and open src/index.ts and add this line:
app.use("*", cors())Here for the simplicity we’re allowing everyone to access our api. In a production app you might want to give it specific permission that you’d like to have to your frontend(s).
Save the changes. Run pnpm build, pnpm zip and then pulumi up inside your infra directory.
We should be back up and running.
It’s all working and running but we’ve one inconvenience. Multiple commands to run our dev server, multiple commands to build our backend, zip it and deploy it. Too much hassle, isn’t it? Well we’ve got pnpm. Open your root package.json file and add the following scripts.
    "dev": "pnpm -r -parallel --aggregate-output dev",
    "build:frontend": "pnpm --filter frontend build",
    "build:backend": "pnpm --filter backend build && pnpm --filter backend zip",
    "build": "pnpm build:frontend && pnpm build:backend"
The dev server will now run with one command in your root directory with their logs. And the build command will now compile and zip both frontend and backend at once. You can build them individually too. And you’re free to add more scripts as you like.